

THE DOWNLOAD LINKS ON THIS PAGE DO NOT WORK AS OF RIGHT NOW. PLEASE DONT CLICK ON ANY DOWNLOAD LINKS THEY WILL REDIRCT YOU TO AD SITES. AT SOME POINT I AM GOING TO REUPLOAD THE FILES AND CREATE NEW TUTORIALS. THANK YOU FOR VISITING MY HELP PAGE.
-NANDOR690
How to install OS X on your hackintosh computer
I created this tutorial because I believe it is important to the AppleTV community. You need OS X to be able to use Xcode to install apps on AppleTV. And Windows PC users should not be left out!!!!!!
This guide is intended to provide you with all the information and tools needed to get your hackintosh up and running. I have been building hackintoshes since 2009. So I can tell you with confidence that I have seen most problems and can fix them. Some fixes are much easier to figure out than others. If this is going to be your first hackintosh build there are a few things that you need to understand before diving in to the world of hackintosh:
1. It is common for you to run into problems. Don't get discouraged. Building a Hackintosh is all about trial and error.
2. No two hackintoshes are exactly alike. I built two different hackintoshes using the same motherboards before and some things would work right out the box and the same things would not work on the other without editing kext or other fixes. Hackintoshes are far from an exact science.
3. There are many different motherboards hackintoshes run on. So there is no way I can have kext for every different combination. But I have set up a forum and you can open threads there and we will be able to work out all the different problems.
If that didn't scare you away......LET'S GET STARTED
IF YOU ONLY HAVE A WINDOWS COMPUTER PLEASE GO HERE. THE DOWNLOADS YOU NEED ARE LOCATED THERE
In the Download section of this site you will find OS X Base System images of the last 2 builds of OS X, OS X Yosemite and OS X El Capitan, that will be ready to restore to your USB. You will also find Clover bootloader there.
Requirements:
1. Click here (to download OS X El Capitan or OS X Yosemite). You can use the .dmg images I have created for you or download them from the App Store. You will also need the Clover bootloader from this section
2. An Intel-based computer
3. A USB drive with 8 GB or more
4. A hard drive that will be dedicated to OS X
5. A Mac running OS X 10.9 or later to create the Install drive.
6. THE WINDOWS TUTORIAL IS NOW LIVE here
Lets get started
If you chose to download OS X from me please start here.
Step 1. Formating hard drive
We will first need to open up Disk Utility. You can find that in /Applications/Utilities/Disk Utility. Or by searching in SpotLight for Disk Utility. Once open you will need to (1) highlight on the left side the USB you wish to use and (2) click on the erase button in the top menu bar. (see image)

Once you click erase you will be greated with a drop down menu. Here you will
Set the Name: InstallOSX (It can be any name you want. I will refer to it by this name for the rest of the tutorial)
Set the Format: OS X Extended (Journaled)
Set the Scheme: GUID Partition Map
Once you have set this then simply click Erase to start formating your USB
Step 2. Restore disk image to USB
Now that we have our USB drive formatted we need to copy over the disk image of OS X to the USB.
If it's not already, open Disk Utility. This time you will highlight the partition you just created (InstallOSX) and then in the
Menu Bar under Edit you will pick Restore

Now you need to double click on the OS X Base System.dmg that you download from my Downloads and you should see
this:
Note: You can press the skip button to skip the verification process when opening the .dmg if you want

Now go back to Disk Utility and click on the arrow for the drop down menu and pick OS X Base System....

and then Restore.
This process with take 10-20 minutes depending on your computer. Grab a cup of coffee and enjoy some fresh air for a
few minutes.
Once the process is complete your newly restored USB will now be called OS X Base System
Step 3. Installing Bootloader
Download the Clover Bootloader from here if you havent already and open it up. Click continue twice and you will be greeted with this screen:

First you will need to click on Change Install Location and pick the USB called OS X Base System.

Then click continue
You should now see OS X Base System in the text as shown in the picture below.

Next click Customize
In the following screen shots I will show you the most common setup to use to install Clover that works. Your mileage
may vary here. All you can do is try it and see if it works. If it dosent dont worry!! Hop on over to the forum and we can
work it out there!!
Under the Customize options choose the following:
Checkmark: Install for UEFI booting only
Checkmark: Install Clover in the ESP
Themes: Pick any theme you desire (only pic one for right now)
Drivers64UEFI:
Checkmark: OsxAptioFixDrv-64

Once you are sure you have these options picked click Install. Clover will ask you for your password. Type in your password and click Install Software.
This should only take 1-2 minutes to install onto your USB.
Step 4: Adding Kext to the install USB
For OS X Yosemite And El Capitan: Follow the steps outlined below
Click here to download the basic kext to get you to be able to boot your install usb and install OS X to a hard drive. These kext will not enable audio, ethernet, wifi or anything else. These are just essential kext to get you to the install screen. Once you have OS X installed and booted to the desktop then you can start tackling other issues.
Included are:
FakeSMC.kext: This is the only kext that is absolutey necessary. It is required to boot OS X
NullCPUPowerManagement: This kext disables AppleIntelCPUPowerManagement.kext to prevent kernel panic (optional)
VoodooPS2Controller: This kext is only required if you still use a PS2 keyboard or mouse (optional)
IF YOU USE THIS KEXT MAKE SURE TO READ THE DIRECTION ON THE DOWNLOAD PAGE OR THE READ ME FILE IN THE DOWNLOAD. THERE ARE 2 EXTRA FILES THAT NEED TO BE PLACED IN THE CORRECT LOCATION FOR IT
TO WORK.
For this next part we will need to open Terminal and run a few command so we can mount the EFI partition and install the kext. Open Terminal by going to /Applications/Utilities/Terminal.
Once Terminal is open we need to start by running the command:
diskuitl list (Then press Enter. You will be greeted with this output)

Here we are looking for the USB named OS X Base System. You can see here that mine is disk5s2. The partition that we want to mount from the USB is the EFI partition. Which you can see in my case is disk5s1
So in Terminal you will type:
diskutil mount /dev/disk5s1 (Then hit Enter) (disk5s1 may not be the IDENTIFIER of yours. You will need to change it to the IDENTIFIER that represents your EFI partition)

You will get a return output that says Volume EFI on /dev/diskXsX mounted (where X is the IDENTIFIER of the EFI partition of your USB)
You will also see that a EFI partition has mounted to the desktop. Double click on the EFI drive to open it. You will see something like this:

Now we need to navigate to /EFI/CLOVER/kexts/10.10.
Or /EFI/CLOVER/kexts/10.11 (If you are installing El Capitan
NOTE: MAKE SURE YOU DELETE ANY UNUSED FOLDERS IN THIS LOCATION. IT CAN MESS WITH YOUR BOOT. SO IF YOU ARE INSTALLING 10.10 DELETE EVERYTHING EXECPT 10.10 FOLDER AND THE 'Other' FOLDER. SAME GOES FOR 10.11

Drag and drop the kext you downloaded into the proper folder. If you are installing OS X Yosemite then the 10.10 folder.
Step 5: Boot into OS X Install
Once you have your OS X Base System USB ready, restart your computer. When you see the begining splash screen you will need to press the the button that allows you to enter the boot menu. I know that on Gigabyte motherboards it is F12. Once you are in the boot menu select your USB drive:

Once you boot your USB you will be greeted with this screen. Press the right arrow key on your keyboard to navigate to the 'options' tab and press Enter

Next you will hit the down arrow key once so 'Boot Args' is highlighted and hit Enter
TYPE: -v (then hit Enter)
This will boot in verbose mode so if you have any errors or kernal panics we will be able to see what the problem is

Now hit the down arrow key on your keyboard to scroll down to 'Return' and hit Enter.
This will take you back to the begining screen.
Here you will highlight your USB so that you see 'Boot Mac OS X from OS X Base System' (see image below)
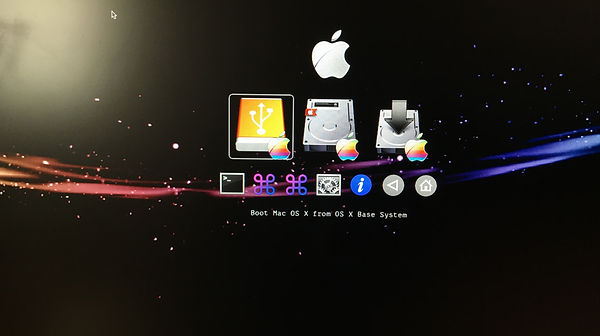
Once you hit Enter you will see this (see video below)
Congratulations! You made it to the install screen! The next thing we need to do is format the hard drive that we will install Mac OS X on.
Go to the top in the menu bar and hightlight 'Utilities' then click on 'Disk Utility'

In 'Disk Utility' you will first pick the hard drive you want to install OS X on from the left menu. Then you will click the 'Erase' button. In the drop down menu do the following:
For Name: Choose whatever name you like (Im calling my hard drive Mac OS X)
For Format: Choose OS X Extended (Journaled) from the drop down menu
For Scheme: Choose GUID Partition Map from the drop down menu

Click 'Erase'
This will only take a couple of minutes to complete. If yours takes longer, just be patient
Once it has completed just close 'Disk Utility' by clicking the red circle. You will be taken back to the first OS X install screen.
Here you will click 'Continue' Twice then click 'Agree' you should now see this:
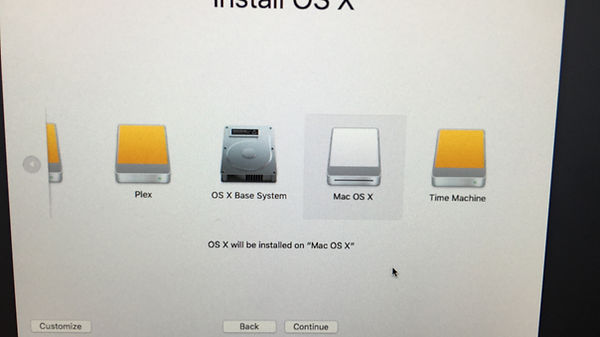
NOTE: You might notice my 'Mac OS X' hard drive appears to be a USB. It is a hard drive though. Once OS X is installed this can be fixed with a kext.
Now choose the hard drive you just formated. My is Mac OS X and click 'Continue'
You will now be greeted with this window:

You are now installing OS X to your internal hard drive. This can take from 15 minutes to 1 hour. Grab another cup of coffee and go get some fresh air
Once it is done installing your computer will reboot. You will need to boot using your USB install that we made earlier. This time you will pick the hard drive that you just installed OS X on. Make sure that you go into 'Options' and put the verbose boot argument in so if you have a problem we can see what the error is.
Once booted into your hard drive you will fill out the information and then be taken to the desktop. From there you will install the Clover bootloader to your hard drive and install the kext to the hard drive how we did outlined in Step 4. This time to your hard drive. If you are running OS X El Capitain make sure you click on the link in Step 4 and install the kext outlined there.
From this point you will need to go through and see what is and is not working. I will have more kext in the kext download with time. But for now, if you have questions just leave them in the comment section below. Or head over to the Forum and start a new thread there.
Enjoy!!!! And most of all HAVE FUN!!!