

THE DOWNLOAD LINKS ON THIS PAGE DO NOT WORK AS OF RIGHT NOW. PLEASE DONT CLICK ON ANY DOWNLOAD LINKS THEY WILL REDIRCT YOU TO AD SITES. AT SOME POINT I AM GOING TO REUPLOAD THE FILES AND CREATE NEW TUTORIALS. THANK YOU FOR VISITING MY HELP PAGE.
-NANDOR690
HOW TO CREATE AN OS X INSTALL USB ON WINDOWS
This guide will be showing you how to create a Mac OS X USB installer on Windows without having to use a Mac computer at all. I think you guys will enjoy it. There are a lot of people that want to build Hackintoshes but thought they had no way to do it because they didn't have a Mac to build the installer. This guide will prove otherwise. It is really simple. I have already created the files for you. All you have to do is install Clover and restore the .hfs file to your USB. I explain in detail below. So don't be nervous.
If this is your first time building a Hackintosh, I suggest you back up anything on Your Windows hard drive you want to keep. This tutorial does not go into how to dual boot Windows and Mac OS X. It just guides you on how to fresh install. I will have dual boot tutorials in the future.
Good Luck!! And and have fun.
If you have any questions leave them in the comments at the bottom of the page.
THIS TUTORIAL WAS DONE ON A WINDOWS 7 MACHINE
THINGS YOU WILL NEED:
1. A working Windows computer :-)
2. A USB drive (8 GB or larger)
3. Bootdisk Utility: Download from here
4. .hfs file: download from here You will find 3 flavors of OS X to choose from. You will also find the rest of the tools you need from that page. Its specifically for Windows Users.
5. Transmac.exe: Download from here
NOTE: IT IS BEST TO CLICK 'SAVE' WHEN DOWNLOADING THESE FILES. THEY WILL SAVE TO YOUR 'Downloads' FOLDER. THEN USE '7-ZIP' TO UNZIP THE FILES.
STEP 1: Downloading hfs file
Navigate to the 'DOWNLOADS' section in the menu bar and click on 'Windows Users Downloads'

Here you will choose the flavor of OS X you want to install. There are three to choose from. Once you click on the image of the one you want you will be greeted with a pop up window. Here you will choose 'Save'

Once you click 'Save' the file will start downloading. It should only take 5-15 minutes (depending on your internect connection). Once it is done you will navigate to your 'Downloads' folder and you will see the file. We need to unzip it now. (I recommend using '7-zip' to do this) So just right click on the file, choose '7-zip' then choose 'Extract Here'.

Once you do that you will see this...

Once it is done extracting you will now see a new folder in your 'Downloads' called 'Volumes'. Double click on the 'Volumes' folder and you will see 'HFS FILE' double click again and you will see another folder called OS X HFS (where OS X will be the name of which ever version of OS X you downloaded from me). In the picture below you will see it as 'El Capitan HFS'.

Double click on that folder and you will now see the file that we need. The name of the file will end in .hfs(as seen in the picture below) Just drag and drop this .hfs file to your 'Desktop'.

We are now ready to restore our usb and make a bootable USB drive for OS X
STEP 2: FORMATTING USB DRIVE
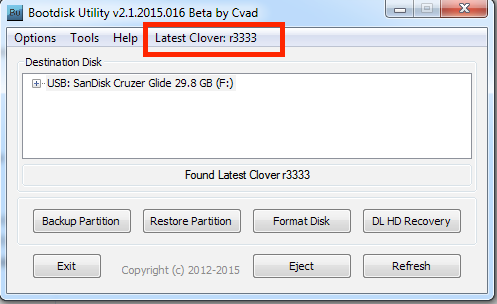
The first thing we need to do is open 'BootDiskUtility'. Right click on 'BootDiskUtility' and 'run as administrator'. Once it opens you will see your USB drive in the 'Destination Disk' window.
Next we need to click on 'Options' then 'Configuration...' you will see this:

Click on the 'Check Now' button and it will check for the lastest version of Clover. Once its done click 'OK' at the bottom. You should now see the verison number of Clover in the 'Latest Clover' section in the menu bar of Bootdisk Utility:
Now we need to highlight the USB you want to format and click 'Format Disk'

You will be greeted with this warning. Click 'OK'

Bootdisk Utility will now start to format and partition your USB drive. You will also see Clover Bootloader being downloaded and installed.
NOTE: If you dont see Bootdisk Utility install Clover then click 'Format Disk' again. This time you should see it install. Once its done you will be able to see Clover partition in 'Computer' with the other Disk.
ALSO NOTE THAT WINDOWS MAY GIVE YOU POP UPS THAT SAY YOU NEED TO FORMAT DISK. CLICK CANCEL ON THESE.

If everything installed right you will see this if you navigate to 'Computer'. You can see Clover (E:) and Local Disk(F:) is the name of my 2 new partitions on my USB drive.

STEP 3: RESTORING .HFS TO USB DRIVE
Now that it is done you can now see the 2 partitions inside of BootDisk Utility. Next we need to hightlight partition 2 (the bigger partition) and click 'Restore Parition'

A new window will open up and you will now need to navigate to the .hfs file that you downloaded earlier. (It should be located on your 'Desktop' if you followed along exactly with my tutorial). Once you found it just highlight it and click 'Open'

Now you will be greeted with this 'Information' window that just lets you know which file you have selected. Click 'Yes'

Bootdisk Utility will now start Restoring the .hfs file to the 2nd partition on the USB drive. This should only take 10 minutes or so...

STEP 4: ADDING KEXT TO THE CLOVER PARTITION
Once 'Bootdisk Utility' is done we need to navigate to 'Computer' and then double click on the CLOVER partition.
NOTE: IF YOU DON'T SEE THE 2ND PARTITON IN 'Computer' THAT IS OK. IT'S BECAUSE IT IS IN A FORMAT THAT WINDOWS CAN'T READ
Once you are in the CLOVER partition you need to navigate to:
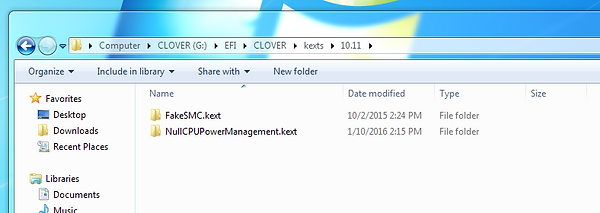
EFI/CLOVER/kexts
You will see this

The first thing we need to do is rename the Folder that is named '10.8'. You will rename this folder to the version number of OS X that you are installing. Since I am using El Capitan for this tutorial I will rename it to '10.11'.
Version Numbers:
El Capitan: 10.11
Yosemite: 10.10
Mavericks:10.9
Like this

Now we are ready to add the kext. Click here to download the basic kext to get you to be able to boot your install usb and install OS X to a hard drive. These kext will not enable audio, ethernet, wifi or anything else. These are just essential kext to get you to the install screen. Once you have OS X installed and booted to the desktop then you can start tackling other issues.
Included are:
FakeSMC.kext: This is the only kext that is absolutey necessary. It is required to boot OS X
NullCPUPowerManagement: This kext disables AppleIntelCPUPowerManagement.kext to prevent kernel panic (optional)
VoodooPS2Controller: This kext is only required if you still use a PS2 keyboard or mouse (optional)
IF YOU USE THIS KEXT MAKE SURE TO READ THE DIRECTION ON THE DOWNLOAD PAGE OR THE READ ME FILE IN THE DOWNLOAD. THERE ARE 2 EXTRA FILES THAT NEED TO BE PLACED IN THE CORRECT LOCATION FOR IT TO WORK.
Note: When downloading the kext please do the same as before. Save the zip file to your 'Downloads' folder and then use '7-zip' to unzip it.
Once you have unzipped them we need to just drag and drop the '.kext' folder(s) to the folder you just renamed. I recommend only using 'FakeSMC.kext' and 'NullCPUPowerManagement.kext' to start with. Like this
The last thing we need to do before we restart is download the Clover Bootloader from here. Save it to your downloads folder as before and unzip it with '7-zip'. Now just drag and drop it into your CLOVER partition. We will need this later. Your CLOVER partition should look like this now
We are now ready to boot into OS X!!!!!!
STEP 5: BOOTING INTO OS X FROM USB
NOTE: IT IS BEST TO USED A WIRED USB KEYBOARD AND MOUSE FOR THIS PORTION OF THE TUTORIAL
Reboot your computer and at the bios splash screen or before your computer starts to boot into windows you need to press the button that allows you to view the boot menu. (usually 'esc' or F12) Once there choose your USB to boot from. In my case it will be the Seagate FreeAgent Go USB


Once it boots you will be greeted with a black screen with a curser in the top left corner. It may stay this way for up to 2 minutes. Be patient.

Once it gets to the Clover screen the first thing you need to do is click the right arrow key on your keyboard until 'Options' is highlighted. Then press 'Enter'

Once in the 'Options' menu you will click the down arrow key on your keyboard 1 time so the 'Boot arg' option is highlighted and hit 'Enter'. You will want to add the boot flag -v so that it will boot verbose mode. This way if you run into a problem booting we will be able to see what went wrong.
Once you add that boot flag (as seen in the picture below) just hit 'Enter' and then down arrow until you highlight the bottom option which is 'Return' and hit 'Enter' on your keyboard again.

That will take you back to the main Clover screne. Now just highlight your USB so that the message says 'Boot Mac OS X from OS X Base System

Hit 'Enter' on your keyboard and it will start booting from you USB. You will be greeted with another black screen with a cursor in the top left. Again it will take it a few minutes before you see some action.
NOTE: THESE BOOTLOADERS ARE NOT PERFECT. IF IT TAKES LONGER THAN 5 MINUTES AND YOU DON'T SEE ANYTHING JUST TRY IT AGAIN. SOMETIMES IT MAY TAKE UP TO 3 TIMES FOR IT TO BOOT.
Once it does start to boot you should see something simalar to this...
Once it is done booting you will be greeted with the OS X Welcome page.

Click the Arrow button to move to the next screen. Once on the next screen you will go to the menu bar at the top of the screen and highlight 'Utilities' and in the dropdown menu click on 'Disk Utility'

Once in 'Disk Utility' you will (1) pick your hard drive you want to format for OS X from the left menu and (2) click 'Erase'. In the drop down menu do as follows:
(3) Name: Whatever name you want
(4) Format: OS X Extended (Journaled)
(5) Scheme: GUID Partition Map
(6) Click 'Erase'

This will only take a few moments. When it is complete just 'x' out of 'Disk Utility' by clicking the red circle in the top left.
Once you are back at the OS X screen just click 'Continue' twice and then 'Agree' and you will be brought to the screen to pick your hard drive. If your hard drives show up in yellow, like in the picture below, don't worry you can fix this later. Right now we are just worried about getting OS X installed. So pick the hard drive you just erased and click 'Continue'

You will now see OS X start to be installed on your hard drive. This will usually take 15-20 minutes.
NOTE: OCCASIONALLY YOU MAY GET AN 'OS X FAILED TO INSTALL' ERROR AT THE VERY END OF THE INSTALL. PAY NO ATTENTION TO THIS. IT DID ACTUALLY INSTALL FINE.

Now just wait for OS X to install. Once it is done your computer will reboot. You will want to boot using your USB drive again. Once you are back to the Clover boot screen continue on to step 6
STEP 6: Booting into hard drive and installing Clover to the hard drive
You will want to boot using verbose mode again. So put that boot flag in as we did before. Once you are back to the main Clover screen you will pick your hard drive that we just installed OS X on to boot from. Once it boots up you will be greeted with the Desktop and the normal stuff like filling in your name and password and things like that.
Once that is done the first thing I like to do is go to the menu bar and under 'Finder' click on 'Preferences' and checkmark 'Hard disks' and 'External disk' you should now see them on your 'Desktop'

Now double click on the CLOVER partition and then find the Clover.pkg that we moved into there before. And double click it you will see this screen.

If it dosent already show that it will be installed on your hard drive (you will see the name of your hard drive on this screen where it says 'Standard Install on "El Capitan") Then you need to click on 'Change Install Location". Then choose the hard drive that we installed OS X on and click 'Continue'

You will be brought back to the main screen and now should see your hard drive name as the target for the install. Next we need to click 'Customize' and you will be brought to this screen by default it will be set to the settings that usually work best. They are:
Install for UEFI booting only
Install Clover in the ESP
Themes: You can pic any theme you want. I suggest just picking one right now
Drivers64UEFI: OsxAptioFix2Drv-64
Like I said these are the default options that usually work the best. Your mileage may vary here. If you have problems with booting after install Clover to your hard drive you should leave a message in the comments and we can work it out.


Once you have the options you think will work best or if you decide to try the default optins click 'Install'
It wont take to long to install. Once its done you will be greeted with the 'Installation Complete!' screen.
